Applying Brands
Branding Irons
Always Use Good Quality Materials
It is recommended that you construct each character of a brand on a separate handle. When you place two or more characters on one handle, they will heat and burn unevenly. A brand like that also tends to slip when you apply it, leaving a distorted or blotched brand.
Every branding iron should be constructed with good quality steel, heavy enough to hold heat. Handles should be made from 1/2 inch rod and be approximately 4 feet long from the head of the iron to the handle loop. When not in use, store branding irons in a dry place. Keep the iron head clean and smooth by using a wire brush or file.
Branding Irons For Cattle
The Size of the Iron is Important
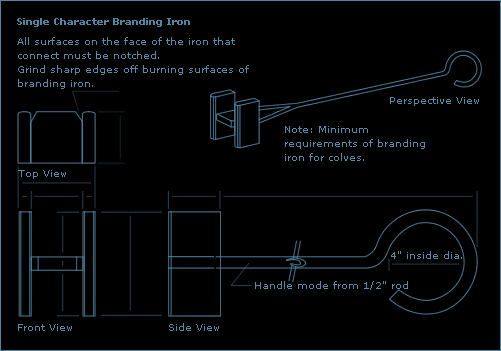
For calves less than one year of age, we recommend that each character be 4 inches high and 3 inches wide (outside measurements).
For grown cattle, it is recommended to use an iron 6 inches high and 3½ inches wide.
The metal used to build the face of the branding iron should be 2 inches deep by 1/2 inch thick. Work the face of the branding surface down to not less than 3/8 inch thick. If the burning face is too narrow, it won’t disrupt enough hair follicles to create a visible brand after hairing over. Also, round the edges and corners of the brand face. Rounding it will narrow the face a bit, but it will leave the center of the burning face slightly higher and leave a concave effect on the surface of the skin to be branded.
If two or more pieces of metal join to make the iron’s face, file or cut a notch at least 1/4 inch deep at the joint to allow some heat to escape. The notch prevents too much heat from being applied at these points. This will prevent blotching.
A good brand warps or dislocates the hair follicles located under several layers of skin. The new hair grows in at a different angle from that of the original hair, thus leaving the brand visible.
Branding Irons For Horses
Special Considerations
Horsehide is much thinner than cowhide. It is recommended that a branding iron for horses be 2 inches high and 1½ inches wide. The face of the iron should be 3/16 inch wide.
Hot Iron
The Right Way To Brand
When an iron is the right temperature, it takes three to five seconds to apply a brand to cattle with a light hair cover. Cattle with extensive hair growth should be clipped before branding, otherwise, it will take longer than necessary to apply the brand.
Branding can be done quickly by pressing firmly and rocking the handle slightly to apply the character evenly. Rocking the handle will prevent over-burn or under-burn in any one spot. When the iron is lifted, the hide should be a buckskin colour.
If the branding iron is lifted too soon, it will leave a temporary brand that will disappear entirely when the animal changes hair. If the iron needs to be applied a second time, apply it in the exact position of the first design. Holding the iron on too long causes unnecessary pain and excessive burning. It also produces a wound that takes a long time to heal.
Don’t brand livestock when their hair is damp or wet. A branding iron applied to wet hide loses its heat fast, scalding rather than burning the branded area.
To apply a good brand, prevent the animals from moving as much as possible. This can be done by using a cattle squeeze or manually wrestling them to the ground. It is best to brand calves using manual wrestling or a calf table. For older cattle, use a squeeze with an opening large enough to both apply the brand properly and avoid crowding the irons on the animal.
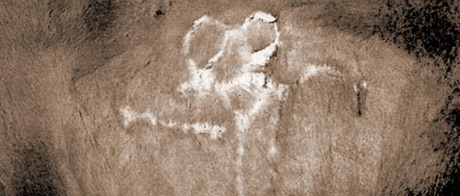
Don’t brand over top of another brand. This can be avoided by clipping the hair from the location where your brand is to be applied. If a brand already exists, apply your brand above, below, behind or in front of the existing brand.
The following image shows the result of branding over another brand:
Your brand cannot be applied to another position on the animal (the rib instead of the shoulder, for example) as it may be registered to someone else in that position.
How To Heat Branding Irons
Best Methods for Satisfactory Results
Solid, dry wood is the best fuel for heating branding irons. To contain a good bed of coals, dig a small pit in the ground 3 feet long, 1-1/2 feet wide and 10 inches deep. Use wood more than 3 feet long, and place the wood the long way over top of the pit. Build a bigger fire than is needed and allow it to burn down until a bed of red-hot coals is gathered in the bottom of the pit. Keep the branding irons on top of the coals and not in the flames of the fire.
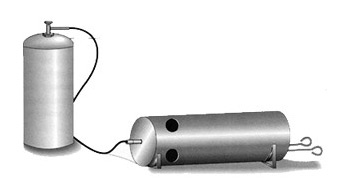
Another satisfactory method for heating branding irons is to use a propane bottle and burner. It is recommended that you use a steel drum or round pipe to contain the heat thrown by the burner. Place the irons in the steel drum or pipe – the heat will be concentrated somewhat within the pipe. This type if heat is clean, easy to move and store and doesn’t leave a messy site.
The following image displays a round pipe that is used to contain heat:
An oven constructed from brick or cement can also be used. This type of oven is usually fuelled by natural gas. Natural gas tends to burn out irons quickly. These ovens are permanent fixtures. They should only be built one in a location - where a continuous volume of cattle is to be branded.
Degree of Heat
Look for the Right Indicators
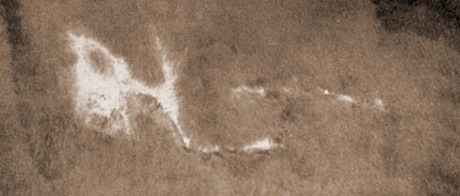
The colour of the iron indicates whether an iron is hot enough to apply a good brand. A black iron is too cold. It may be hot enough to burn the hair, but it won’t be hot enough to deform the roots of the hair follicles. This is essential for a permanent brand. A red iron is too hot. An iron the colour of grey ashes is the proper temperature for branding.
The following image shows a blotched brand caused by a hair fire from a red-hot iron:
Copper irons are different. Copper irons will not look grey, but will show their natural dull copper colour when hot. However, copper irons collect carbon and appear black when they are cold.
Electric Branding Irons
Safely Applying Modern Methods
Using electrically-heated irons has become more common in recent years. Electric irons are completely satisfactory if each character is the recommended size and on a separate handle or offset on the same handle. A heavy extension cord and a good power source are required to provide sufficient heat to the iron.
Electric irons are expensive. Because of the cost, people tend to cluster two or three characters on one handle or heating element to reduce the cost. Doing so results in characters that are too small and too close together. If several characters are clustered on one handle, you are less likely to rock the iron to obtain a distinct outline of each character. However, if they are constructed properly, electric irons work well.
Freeze Branding
The Right Way To Brand
Branding irons for freeze branding can be made from copper or good quality steel. Construct the head of the iron the same way as a hot iron, except use thick, deep metal to get the most benefit from the liquid used to keep the iron cold. The handle can be approximately 12 to 15 inches long. Each freeze brand character should be at least 2-1/2 inches high and 2 inches wide. The metal used should be 1-1/4 inches deep by 3/16 inch thick. The face of the branding surface must be at least 1/2 inch thick with well-rounded corners.
An insulated container large enough to hold enough wood alcohol or methyl hydrate to completely cover the head of the irons will be needed. Also needed will be a good supply of dry ice to cool the liquid to a temperature of –90Fº to –100Fº.
Place the branding irons in the liquid and start adding dry ice. Gloves are needed to handle the dry ice. When the alcohol stops bubbling, the irons are cold enough to apply. Keep the container holding the liquid and dry ice covered as much as possible to prevent the liquid from evaporating. Add more alcohol occasionally to replace what evaporates and more dry ice to keep the alcohol as cold as possible.

Whatever the animal’s age or amount of hair, clip the hair short on the area you want to freeze brand. After the hair has been clipped, wash the area with alcohol to remove any dirt or dust on the hide. Restrain the livestock to keep them from moving around too much.
Apply the cold iron very firmly using two hands to press evenly on the entire brand character. When done, you will have an area indented enough to let you run your finger around the brand design. This is one way to tell that you have a good brand.
The colour pigment of the hair is destroyed by the cold branding. After the freeze brand is applied, the branded area will swell the same as with frostbite. Within several days, the swelling will disappear and there will be no evidence of any brand at all. A small amount of dead skin will be evident in about 7-10 days, but the brand won’t be visible again until the brand design is outlined by the re-growth of white hair on the branded area. The result should show the brand in white hair, making the brand visible during all seasons of the year.
The freeze branding method described above is the least expensive method. To get a colder iron requiring slightly less time to apply, a semen tank using liquid nitrogen as a cooling liquid gives the best results.